
An Elegant & Reliable Door Sensor

In this configuration, with the second iteration of my sensing algorithm, draws ~10ma idle – near the absolute minimum for an Arduino Leonardo. Diagram created with Fritzing.
Last Thursday, October 3rd of 2013 (when I started writing this, as I am so very productive), I was thinking about door sensing – how could I measure the state of the door? I brainstormed with my roommate (Ryan Kubik, mechanical engineering), and we came up with all kinds of ideas; magnetic (à la home security systems), mechanical, ultrasonic, and acceleration, among others.
At one point, I remembered Jack Andraka’s discovery of an electrical-resistance-of-blood test for pancreatic cancer, and started poking around with my multimeter. It’s truly amazing what happens when someone throws a multimeter at a problem.
I turned the multimeter to continuity test mode, and in no time I noticed that the strike plate (the metal thing in the wall, where the bolt docks) is electrically connected to the handle!
Fifteen minutes later, I’d wired an arduino & PowerSwitch Tail up to the door. I modified the sample “Blink” program to read a digital pin (in an ugly loop), turning the (built-in LED on pin 13) on if the door’s voltage is high. I connected the arduino’s ground to the strike plate, and the to-read pin to the handle. I attached 10k pullup resistors to the breadboard’s power rails, so that the closed door connected the pin to ground, and the open door allowed the pullup resistor to pull the pin to the +5v rail (split by the pull up/down resistors to 2.5v). Dangling wires blocked the door. It was ugly and a hack, but functional!
While tweaking, I mistakenly connected 5v to the strike plate. Much to my surprise, I saw the arduino power off (thanks polyfuse! – this device cuts power when it detects a short) only to turn on when disconnected from the strike plate! The strike plate had to be sinking enough current to act as a short – which could only happen if it was connected to something with a massive sinking capacity – ground! Any connection to the arduino’s ground is therefore redundant – thereby I require only ONE connection to the door. I quickly confirmed this. The device was starting to take shape.
I knew that design decisions at this stage greatly affect my future options – time to start thinking ahead. I envisioned it wirelessly transmitting the “door open”/”door closed” signal. I also knew that it’s tremendously inconvenient (and a trip hazard) to run extension cords across a room, to the door – It’d have to be battery-powered. Out again, comes the multimeter.
For two reasons, I decided to power the arduino with 8 AA batteries, connected via snaps to a male barrel jack adapter:
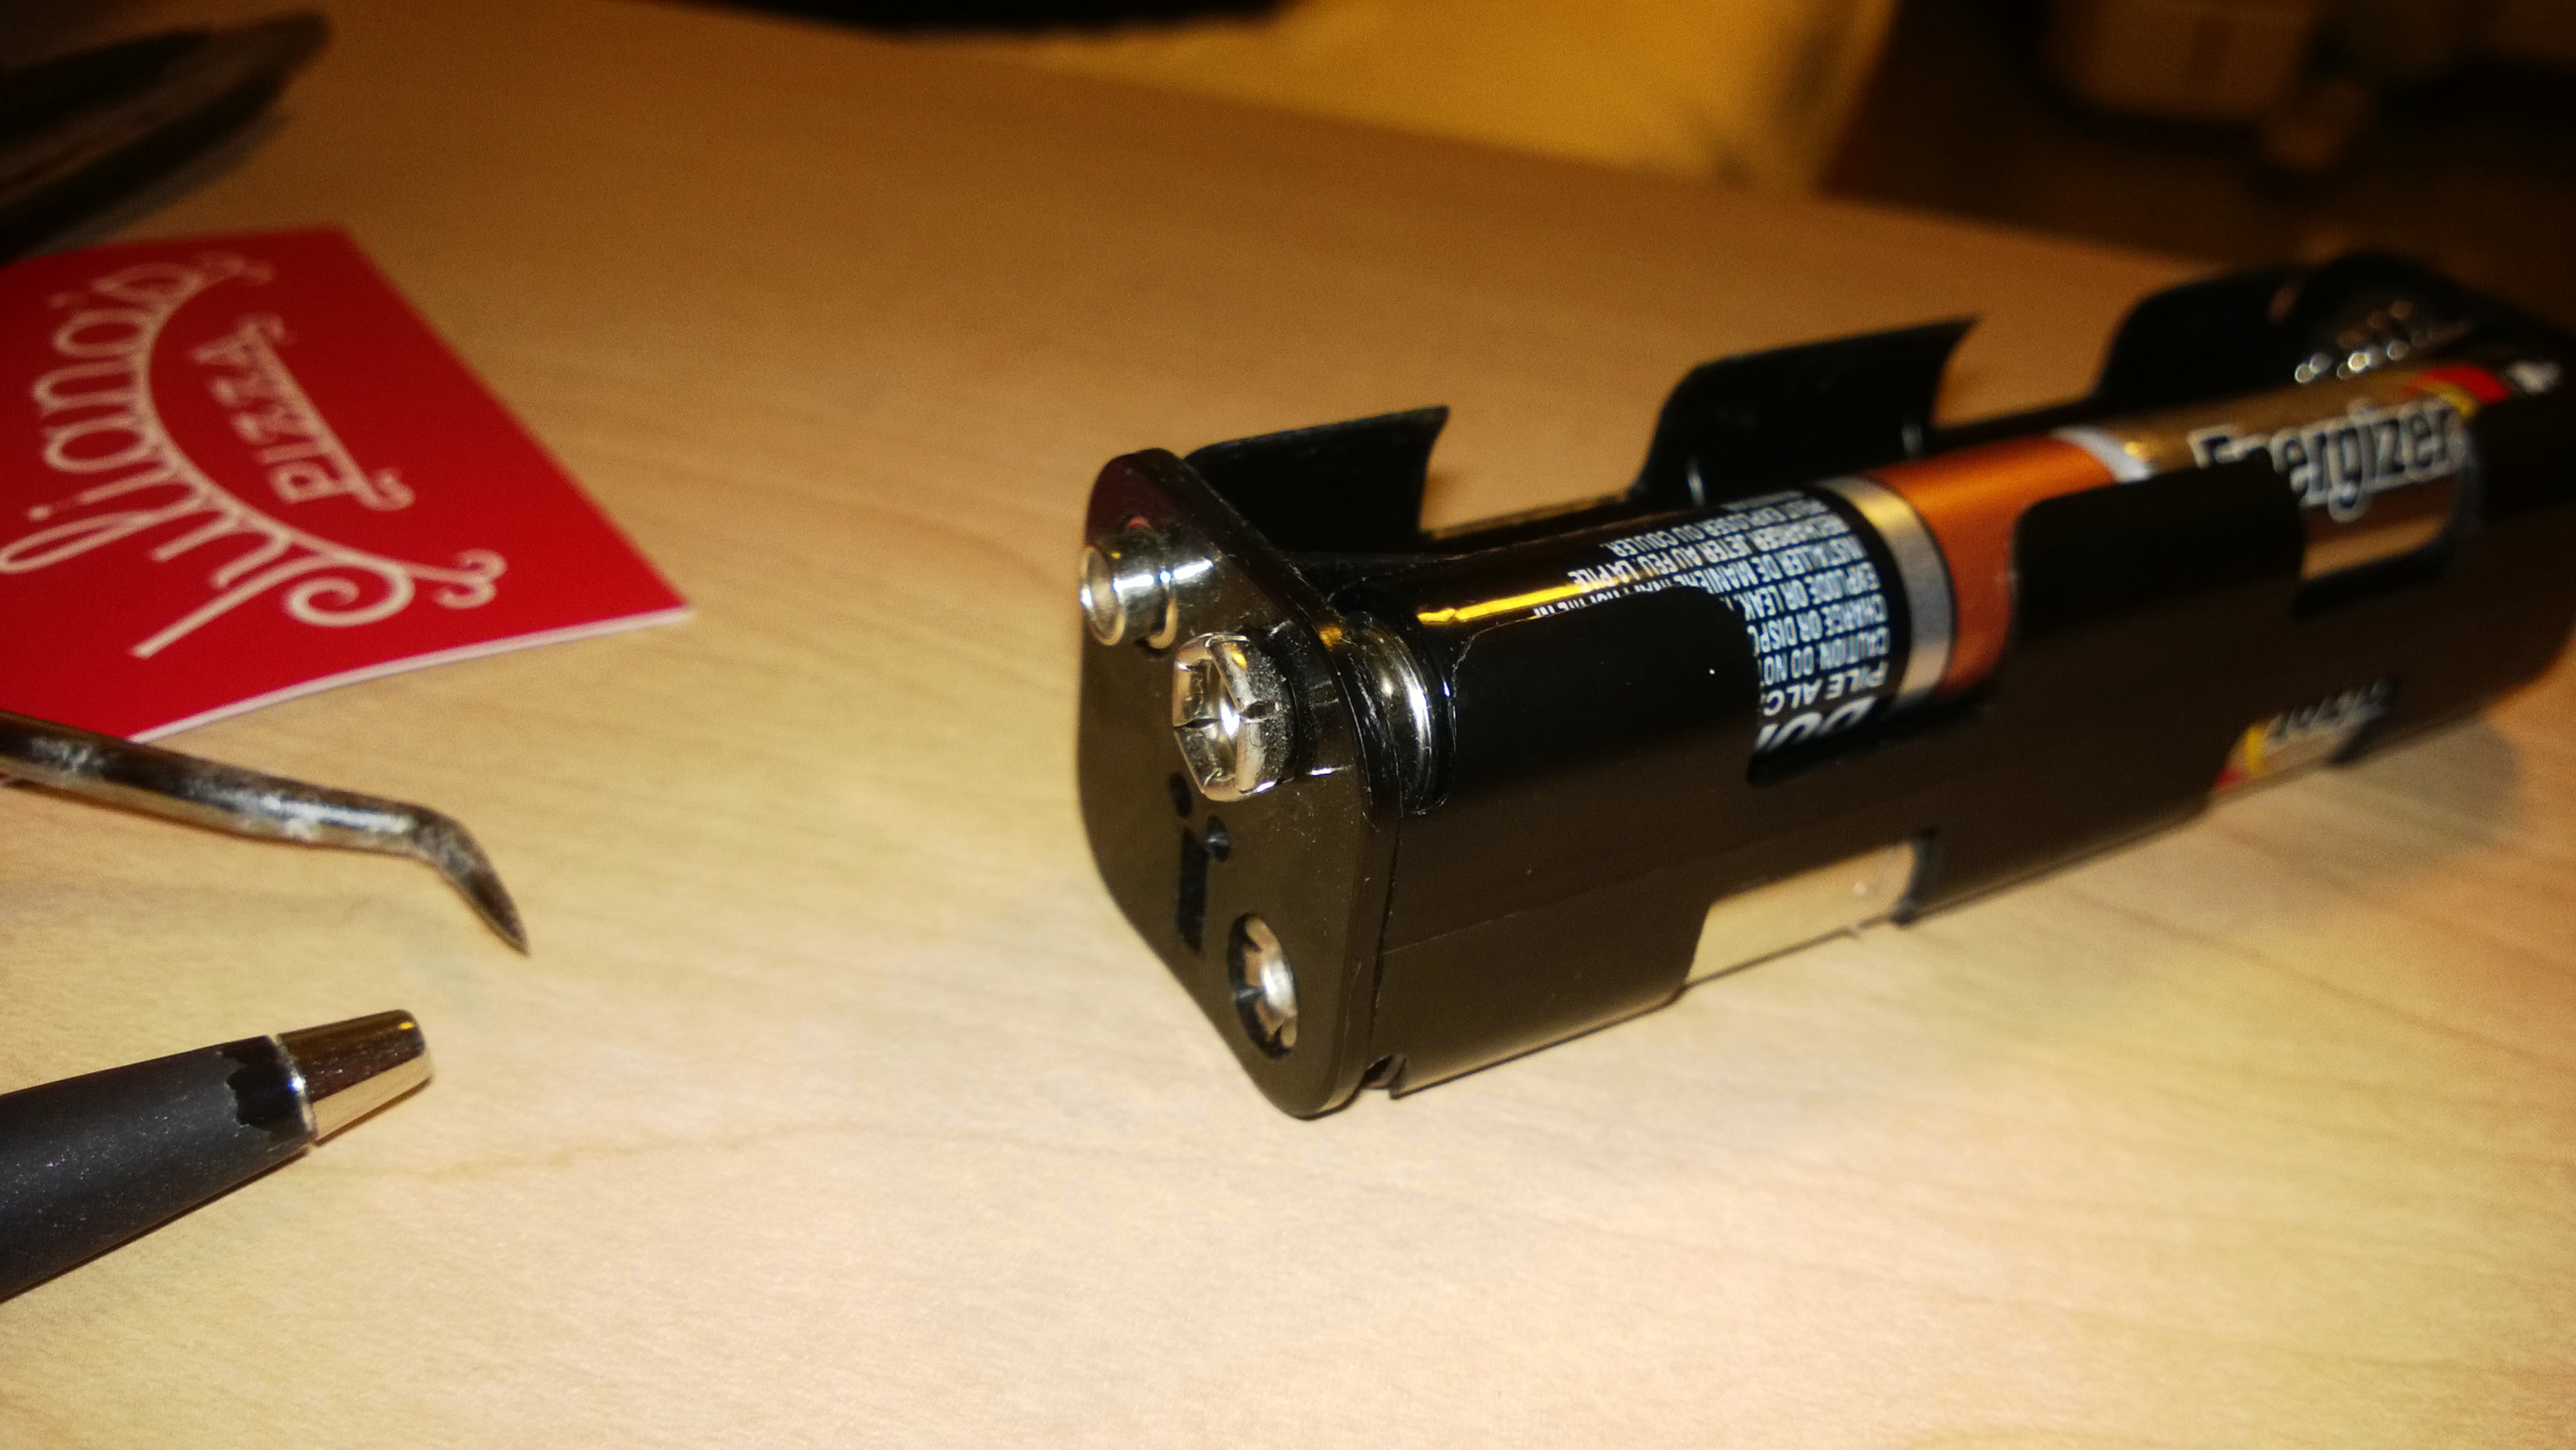
Closeup of the battery holder.

The snaps connected to the battery holder & the barrel jack connector
An 8 pack of AA batteries is quite a power supply for a microcontroller – it will definitely last longer than a puny 9V battery; I can’t produce a regulated 5v for the micro-usb connector, so I’ll have to put up with the inefficient (read: piece of crap) voltage regulator on the arduino. The built-in linear voltage regulator uses about 6ma with NO load, and downconverts via dissipation of energy as heat. When I would later measure the power draw of the arduino, I measure it on the 12V side of the circuit, as that is the actual power draw.
The first working iteration of my code was very power inefficient. I patched my multimeter into the circuit, and measured ~30ma while IDLE (door closed), and ~35ma while active (door open).
void loop(){
	buttonState = digitalRead(buttonPin);
	if (buttonState == HIGH) {
		relay(true);
		delay(500);
	}
	else {
		relay(false);
	}
The two biggest , and also the most convenient, improvements possible for this configuration are elimination of the infinite polling loop, and using a pin OTHER than 13.
As is, the microcontroller is checking the input pin as fast as it can. As a matter of fact, it’s full-throttle checking the input pin one hundred percent of the time. Any microcontroller that is actively executing must power the entire chip – clock distribution, leakage current, extraordinary transient loads presented by switching logic, among a great many – and that power is far more than tolerable. The loop() function is exactly that, and will continue to suck power indefinitely (or the battery dies )
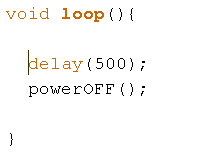
void loop(){
  delay(500);
  powerOFF();
}
In fact, that loop could even consist entirely of NOPs (No OPeration; do nothing), and it would still suck power!
How else can we sense a change in the door, AND take action? The answer lies in the hardware interrupt. A hardware interrupt is a special feature in all modern µControllers/µProccessors that, upon activation, forces the processor to stop any ongoing execution (if any), and execute code specified as an Interrupt Service Routine by the program. The arduino IDE provides the attachInterrupt(pin_number,ISR,type_of_interrupt) function (it’s technically a macro; the compiler just replaces it with the AVR-specific syntax), which defines the pin on which the interrupt is assigned to, the function that will act as the ISR, and the TYPE of interrupt that will trigger the ISR. There are several types of interrupts – RISING, FALLING, LOW, & CHANGE – one of which must be assigned in the third argument to attachInterrupt. For more on the arduino interrupts, see:
and the two github source files linked in the aforementioned post, (Arduino_hardware_arduino_cores_arduino_Arduino (mirror)), (Arduino_hardware_arduino_cores_arduino_WInterrupts (mirror)).
The interrupt allows us to enable a special kind of “Sleep” mode which saves a tremendous amount of power.

See the documentation for more
(http://www.atmel.com/Images/doc7766.pdf) ((mirror))
I’ve removed the debugging information for readability, the source code looks like this:
/*
Button
Turns on and off a light emitting diode(LED) connected to digital
pin 13, when pressing a pushbutton attached to pin 2.
The circuit:
* LED attached from pin 13 to ground
* pushbutton attached to pin 2 from +5V
* 10K resistor attached to pin 2 from ground
* Note: on most Arduinos there is already an LED on the board
attached to pin 13.
created 2005
by DojoDave
modified 30 Aug 2011
by Tom Igoe
DOOR:
With 270 ohm resistor, uses ~30ma idle & relay on
pin 11 instead of 13 saves 1ma
uses 8ma total when idle WITH sleep
ncp1117 uses 6ma typ (10ma max) Quiescent
*/
// constants won't change. They're used here to
// set pin numbers:
#include <avr/sleep.h>
const int buttonPin = 2; // the number of the pushbutton pin
const int ledPin = 11; // the number of the LED pin
// variables will change:
int buttonState = 0; // variable for reading the pushbutton status
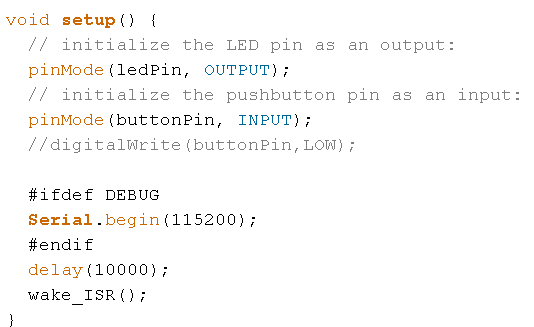
void setup() {
// initialize the LED pin as an output:
pinMode(ledPin, OUTPUT);
// initialize the pushbutton pin as an input:
pinMode(buttonPin, INPUT);
//digitalWrite(buttonPin,LOW);
delay(10000);
wake_ISR();
}
void wake_ISR(){
buttonState = digitalRead(buttonPin);
if (buttonState == HIGH) {relay(true);}
else {relay(false);}
}
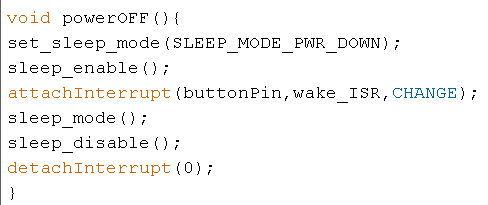
void powerOFF(){
set_sleep_mode(SLEEP_MODE_PWR_DOWN);
sleep_enable();
attachInterrupt(buttonPin,wake_ISR,CHANGE);
sleep_mode();
sleep_disable();
detachInterrupt(0);
}
void loop(){
delay(500);
powerOFF();
}
void relay(boolean on){
// the relay turns off when led is ON, and turns on when led is OFF
if (!on){
digitalWrite(ledPin, HIGH);
}
else{
digitalWrite(ledPin, LOW);
}
}
High-Level overview of the code:
First, I assign the pins as in the schematic at the top of the article:
The delay is for debugging – so when I apply power to the µC, I can see that ledPin works.
Next, I define the ISR that we’ll see assigned in a moment:

I’ve abstracted from the actual state of the pin attached to the relay by defining a relay(boolean) function – it can be counterintuitive and thereby confusing when toggling.
Now, I define the all important sleep function:
Then, (jumping out of the order in the source code, which doesn’t matter to the compiler) I define the relay abstracting function:
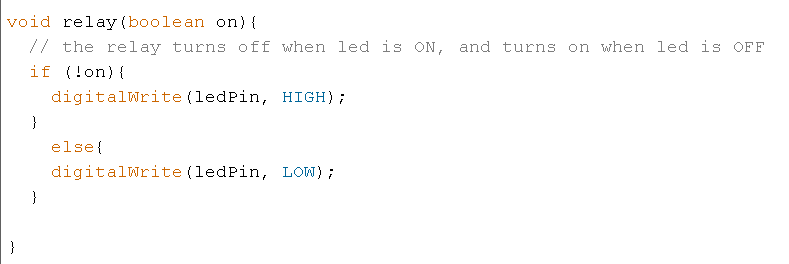
As if #DEFINE TRUE FALSE wasn’t enough
And lastly, a ridiculously short loop:
The delay(500) is a really ugly bit of software debouncing
Program flow:
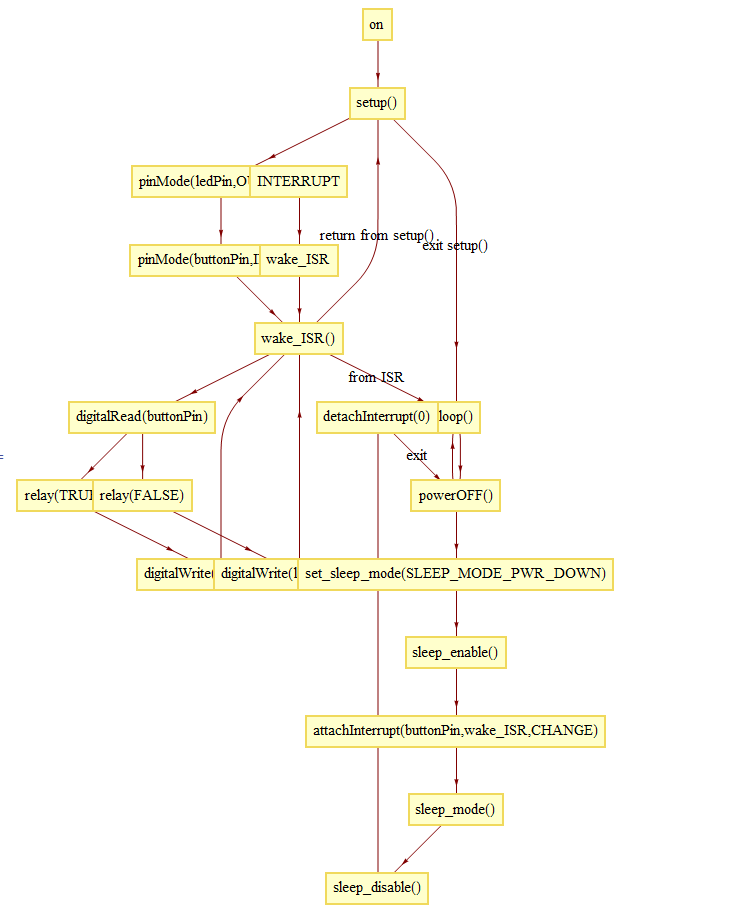
Created with Wolfram Mathematica. Source code:
LayeredGraphPlot[{"on" -> "setup()","setup()" -> "pinMode(ledPin,OUTPUT)",{"setup()" -> "loop()", "exit setup()"},"pinMode(ledPin,OUTPUT)" -> "pinMode(buttonPin,INPUT)","pinMode(buttonPin,INPUT)" -> "wake_ISR()",{"wake_ISR()" -> "setup()", "return from setup()"},"wake_ISR()" -> "digitalRead(buttonPin)","digitalRead(buttonPin)" -> "relay(TRUE)","digitalRead(buttonPin)" -> "relay(FALSE)","relay(TRUE)" -> "digitalWrite(ledPin,LOW)","digitalWrite(ledPin,LOW)" -> "wake_ISR()","relay(FALSE)" -> "digitalWrite(ledPin,HIGH)","digitalWrite(ledPin,HIGH)" -> "wake_ISR()","powerOFF()" -> "loop()","loop()" -> "powerOFF()","powerOFF()" -> "set_sleep_mode(SLEEP_MODE_PWR_DOWN)","set_sleep_mode(SLEEP_MODE_PWR_DOWN)" -> "sleep_enable()","sleep_enable()" -> "attachInterrupt(buttonPin,wake_ISR,CHANGE)","attachInterrupt(buttonPin,wake_ISR,CHANGE)" -> "sleep_mode()","sleep_mode()" -> "sleep_disable()","sleep_disable()" -> "detachInterrupt(0)",{"detachInterrupt(0)" -> "powerOFF()", "exit"},"INTERRUPT" -> "wake_ISR","wake_ISR" -> "wake_ISR()",{"wake_ISR()" -> "loop()", "from ISR"}},VertexLabeling -> True, ImageSize -> Large]
Low-Level flow:
When the program actually executes, setup calls digitalWrite to set ledPin & buttonPin; setup calls wake_ISR(), determining the initial state of the door; wake_ISR() then calls relay(boolean) to set the state of the relay – and setup() returns. Next, loop() calls powerOFF(); powerOFF contains a bunch of low-level macros, i.e
SLEEP_MODE_PWR_DOWN:
#if defined(__AVR_ATmega161__)
 #define SLEEP_MODE_IDLE 0
 #define SLEEP_MODE_PWR_DOWN 1
 #define SLEEP_MODE_PWR_SAVE 2
 #define set_sleep_mode(mode) \
 do { \
 MCUCR = ((MCUCR & ~_BV(SM1)) | ((mode) == SLEEP_MODE_PWR_DOWN || (mode) == SLEEP_MODE_PWR_SAVE ? _BV(SM1) : 0)); \
 EMCUCR = ((EMCUCR & ~_BV(SM0)) | ((mode) == SLEEP_MODE_PWR_SAVE ? _BV(SM0) : 0)); \
 } while(0)
sleep_enable():
#define sleep_enable() \
do { \
 _SLEEP_CONTROL_REG |= (uint8_t)_SLEEP_ENABLE_MASK; \
} while(0)
also: sleep_mode(), & sleep_disable().
If you want to see for yourself: the source is here, and mirrored here.
powerOFF prepares the arduino for sleep(set_sleep_mode, sleep_enable), attaches an interrupt to buttonPin (the one connected to the door), before finally enabling sleep mode (sleep_mode). When the interrupt is triggered, program execution resumes at sleep_disable() (to stop sleeping), and immediately thereafter the Interrupt Service Routine begins. wake_ISR simply turns the relay on if the door’s voltage is enough to register as a digital HIGH, or off if digital LOW. Then execution jumps to loop(), which calls powerOFF and immediately puts the arduino back to sleep.
Looking forward
My next move will be to further reduce power, and later add radio-frequency communication. I have some SparkFun cheap-o R/F breakouts, and all I need is time.
There are some great power saving techniques here: http://gammon.com.au/power (mirrored: Electronics _ Microprocessors _ Power saving techniques for microprocessors)
Postscript
I’ve been doing some very cool things here at Poly, but I’m very busy. I don’t always get a chance to keep up with everybody(i.e. I can barely keep up with anybody) – Shoutout to Mr.Zachry!

[…] provided they’re well documented. We hope that the Hackaday readers also think that the door sensor that [Alexander] developed falls into this category. Instead of using common methods such as a magnet + reed switch, he […]
LikeLike
Using a Door Handle Conductivity to Detect Intruders said this on March 31, 2014 at 12:00 am |
[…] provided they’re well documented. We hope that the Hackaday readers also think that the door sensor that [Alexander] developed falls into this category. Instead of using common methods such as a magnet + reed switch, he […]
LikeLike
Using a Door Handle Conductivity to Detect Intruders - Tech key | Techzone | Tech data said this on March 31, 2014 at 12:09 am |
Very well documented.The Interupts are hard for me to follow but this runs on my arduino and power saving is a huge problem for me . Thanks
LikeLike
Don’t worry! Interrupts are hard to follow by nature.
Maybe this helps? https://aricciodotcom.files.wordpress.com/2014/04/wake_isr.png
LikeLike
I should mention for old 70 year eyes the black background makes reading difficult . If anyone else has problems turn the stle off by View->Use Style->None gives a white background .
Control Plus a few times and Bingo !
LikeLike
Interesting…I could never have predicted that the black background could be a problem! (oh the joy of hindsight)
ctrl + a (or whatever the ‘select all’ shortcut is on your platform) should also help.
LikeLike
I posted this on hackaday sorry. Its probably not going to get much exposure now as the public moves on so I’ll duplicate it here . Hopefully you will aprove . Thanks for the tips above too they are good . I want to get interupts working for a radio project to cut battery power use
“I’m trying it on a breadboard as per your fritzing and using the sense wire to contact positive and negative to operate it -no pushbutton. The problem seems to be not the wiring but the interupt code . It gets the first state when it resets but does not change after that no matter where I put the sense wire . I have Duemilanove boards and I have not noticed a polyfuse .Does your interupt code work on a 328P chip? Have you tried it at all . Are there perhaps some timer or register changes required for the 328P”
I can add here that I have added debug Serial.println()’s all over the place to find why it does not run and can see that the interupt routine is not recognising the interupt at this stage
Thanks again
LikeLike
I responded on Hackaday:
“Duemilanove boards absolutely SHOULD have a polyfuse, so that shorting 5v ➡ ground cuts power to the board. Does shorting 5v ➡ the strike plate on your door have the same effect?
Both the Leonardo and the Duemilanove have pin 2 mapped to an interrupt-supporting µc pin, and unless you’re writing assembly instead of C, you shouldn’t need to make any changes.
what exactly is your sense wire connected to? What happens when you replace the resistors with jumpers?”
Also, try setting up a timer interrupt (In ADDITION to, OR INSTEAD of), see if the arduino is woken up by that.
Best of luck!
LikeLike